How to use the EPEver PC software for charge controllers
There are many popular solar charge controllers from EPEver/EPSolar in the market, but the configuration and monitoring options are limited and complicated out-of-the-box. However, by connecting the charge controller to a PC, you get a lot of options.
EPEver / EPSolar charge controllers are usually just plug-and-play, and some, like the Tracer-BN series, comes without a display altogether. Although you can buy the MT50, a display with buttons that gives status and configuration options, it is quite cumbersome to work with.

Luckily, you can connect most EPEver / EPSolar charge controllers to your PC (Windows only), and use EPEver's downloadable software to both do the configuration and monitoring. You don't have to keep the PC connected after configuration is done unless you want to monitor your solar charger(s) continuously. All you need to connect the charge controller to your PC is an RS485 to USB cable. This can usually be purchased from the same stores that sell the controller.
Getting the EPEver solar station software
The software you need can be downloaded from the EPEVER website.
Click here to go to the EPEVER download site
If the link does not work, try to search for EPEVER charge controller download.
Download and install the program called Charge Controller V1.xx - Windows .zip. The software is compatible with the Tracer-A, Tracer-AN, Tracer-BN, Tracer-BP, Tracer-BPL, Tracer-CN, iTracer, eTracer, LandStar-B, LandStar-BPL, ViewStar-BN, TRIRON, XTRA, and GoMate charge controller series.
Installing the solar station monitor software from EPEver
- Unpack the downloaded file
- Open Charge Controller V1.xx-Windows > PCSoftware, right-click on the setup file and run as administrator
- Follow the installation guide (click Next, Next and Close)
- The software is now installed on your computer and is named Solar Station MonitorV1.xx
PS! Do NOT delete the installation folder yet, you will need to install the cable driver later on.
Double click Solar Station MonitorV1.xx to open it. On startup, a window called Station Information appears. Close this window.

In the left column, delete the station that is already added, by right-clicking on COMxxx record, select Remove Port, and confirm by clicking Yes.
Close the solar station monitor software for now, as you will have to install the USB driver for the cable first.
Install the EPEver RS485 to USB driver
Connect the RS485 to USB cable to your PC (the USB connector) and the charge controller (RS485), and install the driver for it:
- Open Charge Controller V1.xx-Windows > USBDriver, and double-click on the Setup file. Follow the steps until the driver has been installed.
- Open the Device Manager in Windows (Right-click the Start button or press the Windows logo + X key combination on the keyboard and, from the list, click to select Device Manager)
- In the left menu, click Ports, then double-click on xxxxxxx USB UART (COM3). Select the Port Settings tab, and make sure that the RS-485 checkbox is checked. If not, check the box and press OK to close the device window.
- Close Device Manager.
Configuring the solar station monitor software
Double-click Solar Station MonitorV1.xx on your desktop to start the charge controller software. Once again, the configuration window appears. There are a few steps you need to go through before the software can communicate with the charge controller:
- When the Controller tab is selected, make sure Port is set to COM3.
- Click the Station Information tab. Change the Station name to something meaningful (default is Num1)
- Uncheck the box at the bottom of the window that says "Open Station Information dialogue box..." to avoid the config box to appear every time you open the software.
- Click Add.
You're almost ready to begin using the software, however, there is one last step:
- In the top menu, select Port Config(C) > Port Configuration
- Make sure COM3 is selected as Port, and click Add
- Close the window
Now, click Start Monitoring, and within a few seconds, you should see some live* data from your charge controller.
* updated every 30 seconds, but can be modified.
What does the charge controller monitoring data say?
First, congratulations, you have managed to connect your EPEver / EPSolar charge controller to your PC and is now able to both configure and monitor your solar power system easily.
To get some more space for the monitoring data, you may hide some not so useful sections.
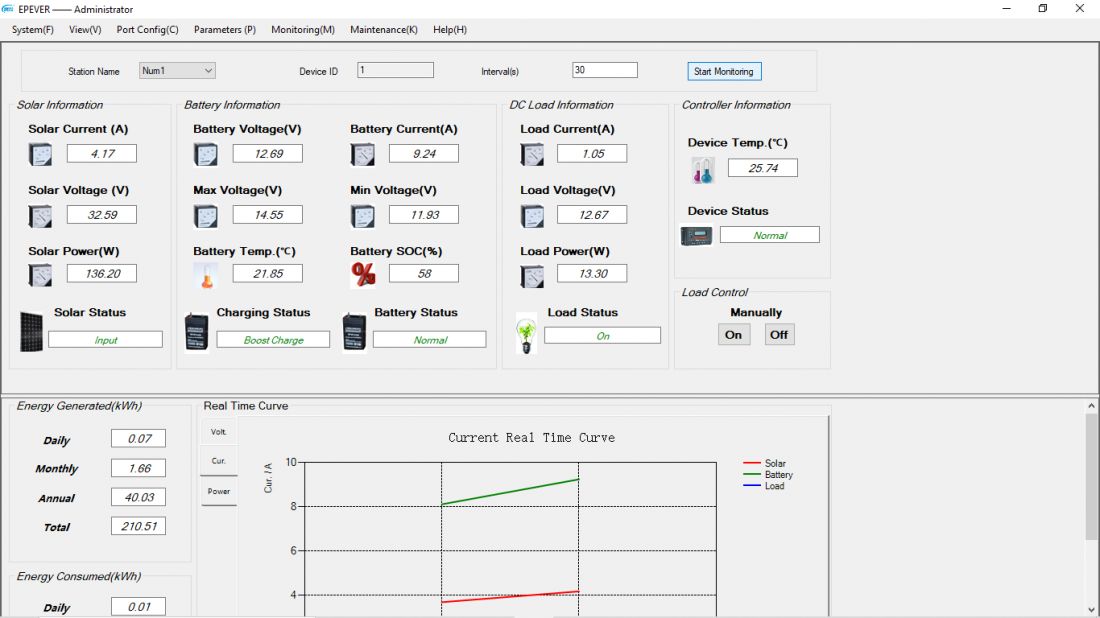
Select View(V) from the top menu, and uncheck both Tool Bar(T), Station Explorer and Message Window.

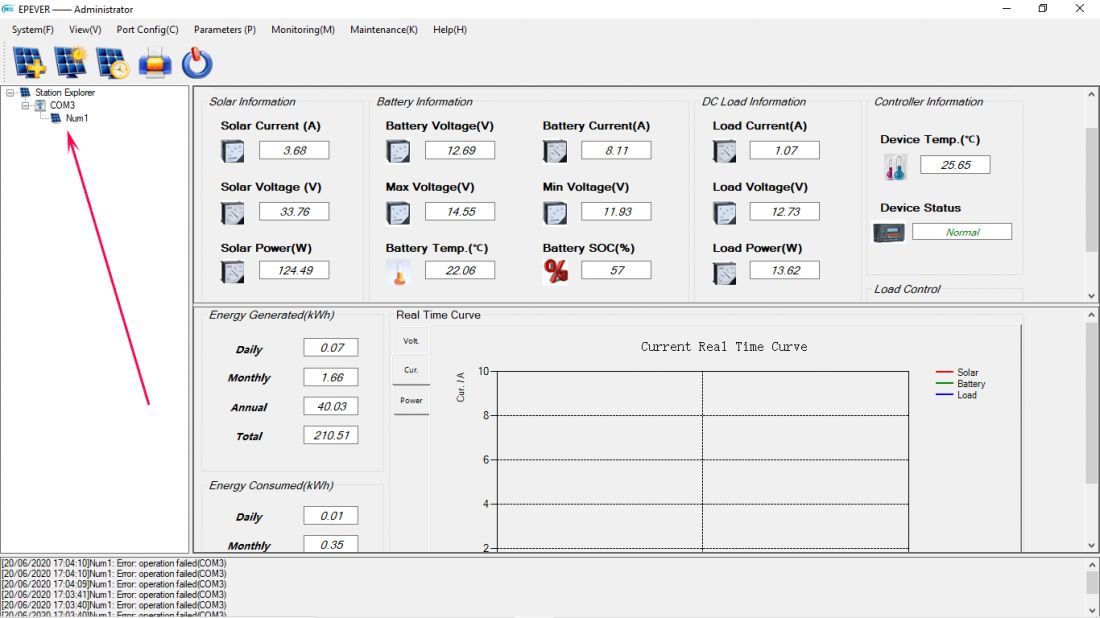
The Solar Station Monitor "live" data
In the upper section, you have all the "live" data from the charge controller. Well, it's actually not completely live but is downloaded every few seconds from the charge controller. You can actually change how often the information should be refreshed, by changing the interval(s) value. The default value is every 30 seconds, which is just fine for most people.
The information is divided into four sub-sections:
- Solar Information
- Solar Current (A): This shows how many Amps are currently coming from your solar panel or solar array (solar panels that are connected together). If you compare with the short circuit current or rated current on the back of your solar panel, you can get an impression on how much of the total capasity you're getting out of it at any given time.

- Solar Voltage (V): The voltage that is coming from the solar panel.
- Solar Power (W): To get the solar power in Watt, the software multiply Amps with Voltage; (A)*(V) = (W)
- Solar Status
- Solar Current (A): This shows how many Amps are currently coming from your solar panel or solar array (solar panels that are connected together). If you compare with the short circuit current or rated current on the back of your solar panel, you can get an impression on how much of the total capasity you're getting out of it at any given time.
- Battery information
- Battery Voltage (V): The voltage of the battery. Normally a little above 12V when idle, up to 13.x when charging, but it should not drop below 10.8. However, the charge controller will turn off the load if the battery voltage drops too low, in order to protect the battery.
- Battery Current (A)
- Max Voltage (V): The highest voltage since the monitoring started.
- Min Voltage (V): The lowest voltage since the monitoring started.
- Battery Temp.: If you have connected a temperature sensor to your charge controller and placed in on the battery, this will show the current temperature of your battery. Should normally be around the same temperature as the surrounding air. A very hot battery can be a sign of a short circuit.
- Battery SOC(%): State of charge. This percentage value has to be taken with a grain of salt. It's better to look at the battery voltage and the load wattage; It the load is low and the battery voltage is low, then the SOC is actually low. However, you might have a heavy low (also directly on the battery). If so, the battery voltage might drop as well.
- Charging Status: Float charge, boost charge, or equalizing charge.
- Battery Status: Notifies if something is wrong with the battery, but you might take it with a grain of salt. If you get an error, you may try disconnecting the battery from the solar charge controller, and put it on an "intelligent" 12V battery charger for a while to see if it takes charge.
- DC Load Information
- Load Current (A): The amount of current that is drawn through the load output of the solar charging controller.
- Load Voltage (V): The voltage on the load output.
- Load Power (W): Load Amp times load Voltage; (A)*(V) = (W)
- Load Status
- Controller Information
- Device Temp.: The temperature of the charger. Under high charge and/or load, the solar charge controller will heat up, so make sure it has some airflow around it.
- Device Status: Notifies you if the charge controller is okay, or if there is an error. In case of an error, try disconnecting both the solar panel and the battery connections, then reconnect to see if the error is gone.
In addition, you have the Load Control, where you can manually turn the power output from the charge controller on and off.
The solar station monitor graphs and statistics
In the lower section, you have some statistics and charts available. The charts are incremented as long as the monitoring is active, and you might want to clear the charts once in a while. You can do so by right-clicking on the chart, then select Clear.
In the left column, you have some key numbers of how much power your solar setup has generated; daily, monthly, annual, and in total. You also have the same numbers for power consumption through the controller load.
In the Real Time Curve sub-section, you have access to 3 different charts; Voltage, Current, and Power.

The voltage chart shows the voltage development over time for both the solar panel, the battery, and the load. For some unknown reason, the battery curve does not show up in our setup.
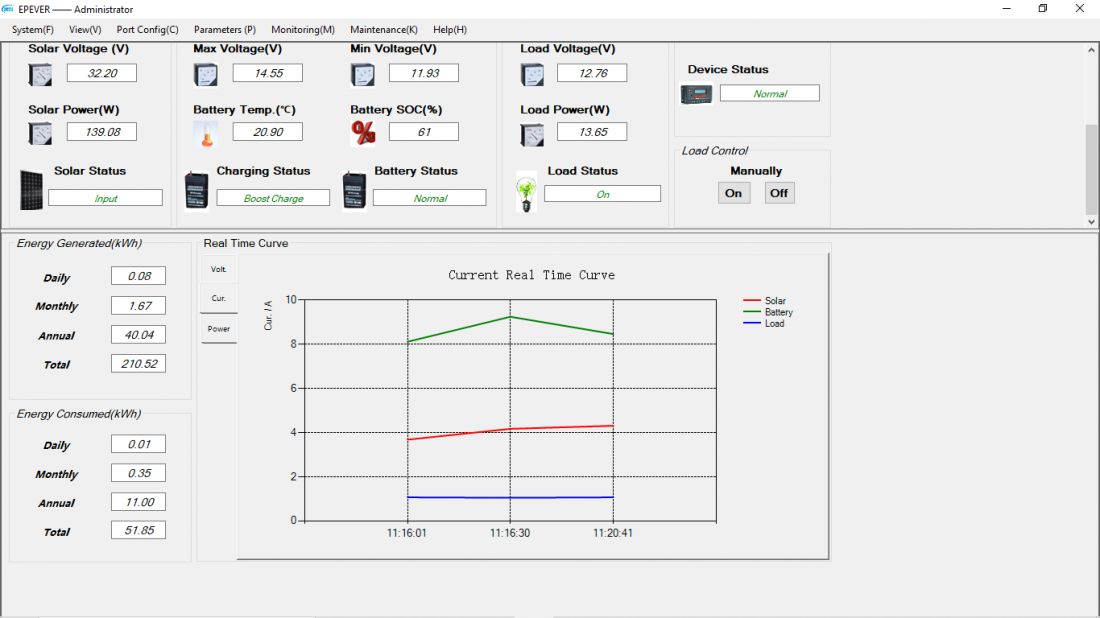
The current chart shows the Amperage curves for the solar panel, the battery (the current going from the controller and into the battery), and the load.
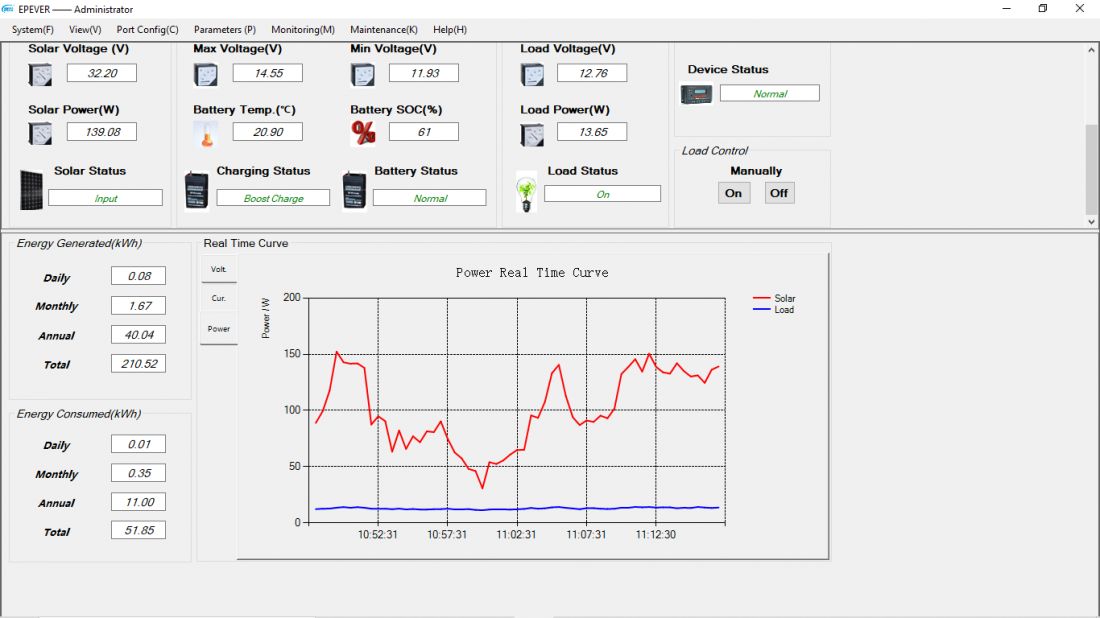
The power chart is the most useful, in our opinion. It shows the wattage development for the solar panel and the load. Here, you get an impression of how well your solar panel setup is performing. In our setup, we use a 200W panel, but it's rear to have the wattage above 180W.
Changing the settings for the EPEver solar charge controller with the software
It's possible to do some tweaking of the settings on the charge controller with the solar station monitor as well.
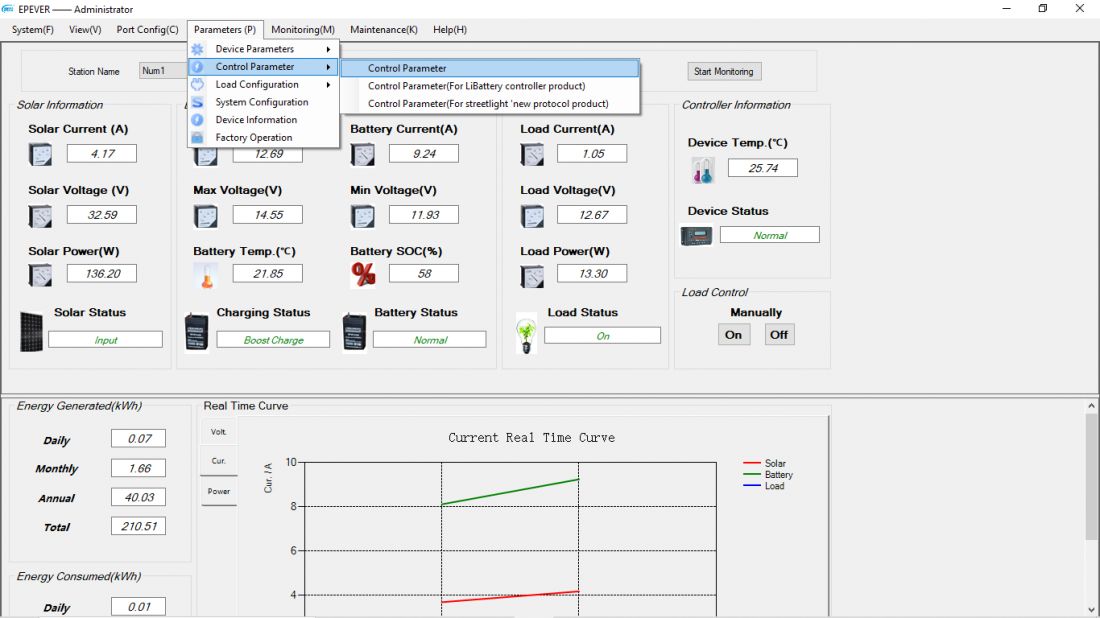
To enter the settings panel, select Parameters (P) > Control Parameter > Control Parameter from the top menu.

Before you can change anything, you have to fetch the current settings from your charge controller. Click the Read button in the bottom left corner to download the current settings.
From here, you can change most of the parameters. However, be careful and know what you're doing; altering the settings can potentially damage the battery and equipment connected to the charge controller.
We have found that most of the default settings are just fine. But you might want to alter the battery type and battery capacity according to what you have connected to your solar setup.
If you change any settings, remember to click the Update button in order to write or upload the changes to the charge controller.