How to program the MT50 solar charge control display interface
The MT50 is a remote meter for EPEver / EPSolar charge controllers and enables easier configuration and the ability to see the charge controller status on more convenient places in e.g. an RV. This guide covers common tasks and configurations, step-by-step.
Connect the MT50 to a charge controller
Use the cable the comes with the MT50, connect one end into the data port of the charge controller, and the other into the MT50. You should immediately get the charge controller status on the MT50 display. If not, check if the charge controller is actually running, and that the cable is properly connected. Make sure the MT50 is compatible with your charge controller model. It should work with all EPEver / EPSolar LSxxxxB(P), VSxxxxBN, and TracerxxxxBN(P) controllers.

Related: How to use the EPEver PC software for charge controllers
MT50 real-time monitoring
The MT50 shows the most important information you need from your solar power system:
- If the solar panel is generating electricity, what's the voltage from the solar panel, and how much power is it delivering (amps).
- The status of the battery*, the voltage, and how much power it is charging with (amps).
- The load (on or off), and how much energy is being used by appliances connected to the solar charge controller.
* We've experienced that the battery status symbol and smiley face can be a bit misleading, and not necessarily reflect the actual state of the battery. You should instead look at the voltage; If above 12V, you're good, but if it's below 11V, you should cut the load and let it charge for a while. That being said, if you're having a heavy load on the battery, e.g. through an inverter that is directly connected to it, the voltage reading may be low as the long as the current is high. The actual state of charge is most correct when the battery is idle (no charge or discharge).
You can find the complete manual for the MT50 at the EPEver website.
Navigating the MT50
The EPEver MT50 remote meter has 6 buttons underneath the display: Esc, Left, Up, Down, Right, and OK. In general, the OK button is used to enter menus and save options, the arrows are used for navigation and changing values and options, and the Esc button is used to go back or exit the menu.
When pressing the OK button, you will first enter the menu. Pressing OK once more, you get the subpages on the chosen menu item, and pressing OK once again, you can change the parameters for that subpage. Pressing Esc takes you the same way backward.
Changing values might require a password. The default password for the EPEver MT50 is 000000. If you change several settings in the same session, you will not be asked for the password every time, but you will be "logged out" after about 10 minutes.
Finding your charge controller model ID with the MT50
To get information about your charge controller, press Esc to enter the main menu. Use the Down button to navigate to 2. Device info, then press OK to enter it. On the first page, you will find the model, what voltage it is rated for, max charge current, and max discharge current. Press the Down button to go to the second page to see the serial number of your charge controller device.
Change the charge controller date with the MT50
From the main screen, press Esc to enter the menu. Use the Down button to navigate to 6. Device Para. and press OK to enter it. You will see a page with an ID number (usually ID: 001). Press the Down button and you will get the page with the date and time settings. Press the OK button to be able to change it. You might be asked to enter a password. If you haven't changed it, the default password is 000000. Press OK. Use the Right and Left button to select the different parameters, which are:
- Backlight time: The number of seconds the backlight should be on when inactive.
- Month
- Date
- Year
- Hour
- Minute
- Second
If you're done doing any changes, press the OK button. When prompted with either Save or Cancel, Save is selected by default and you can press OK to save the changes. If you don't want to save, press the Right button so that Cancel is selected, then press OK.
Press Esc until you're back at the main page.
Can I use an ethernet cable to connect the MT50 to the charge controller instead of the included one?
Yes, you can. It's sometimes more convenient if you're pulling the cable through cabinets or walls (for instance in an RV camper) to create holes only big enough for the cable to go through. Use a normal CAT5 ethernet cable without plugs, at least not at the end that you're pulling through the holes. Then, use a proper tool to put a new RJ45 plug onto the cable. Just make sure the connectors are located correctly. If not, it may damage your MT50 remote meter, and possibly the charge controller as well.
The following video shows how to attach the RJ45 plug to an ethernet cable:
Warning! Despite using a network cable, neither the charge controller nor the MT50 can be connected to a PC network port, a router, or any other network device.
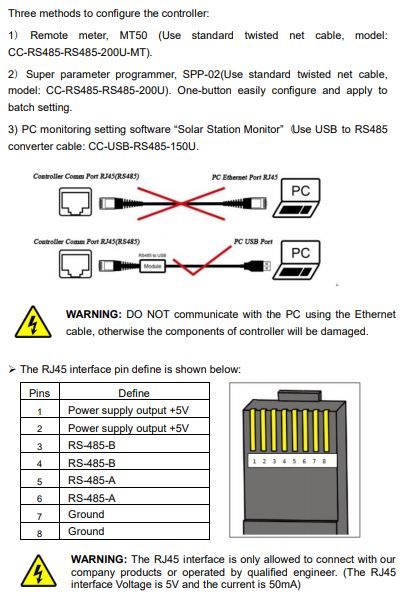
If you want to connect the charge controller to a PC, you must use a special RS485 to USB cable and the solar station monitor software from EPEver.